A helpful guide on how to care for your shipped eggs.
Firstly, I want to thank you for purchasing eggs from us! We appreciate every single order we get. We are a small, single family farm (Just me, my husband and our Daughter!), and raising chickens and other fowl has become a passion of mine over the last 25 years, ever since my mom got me into 4H as a clover-bud!
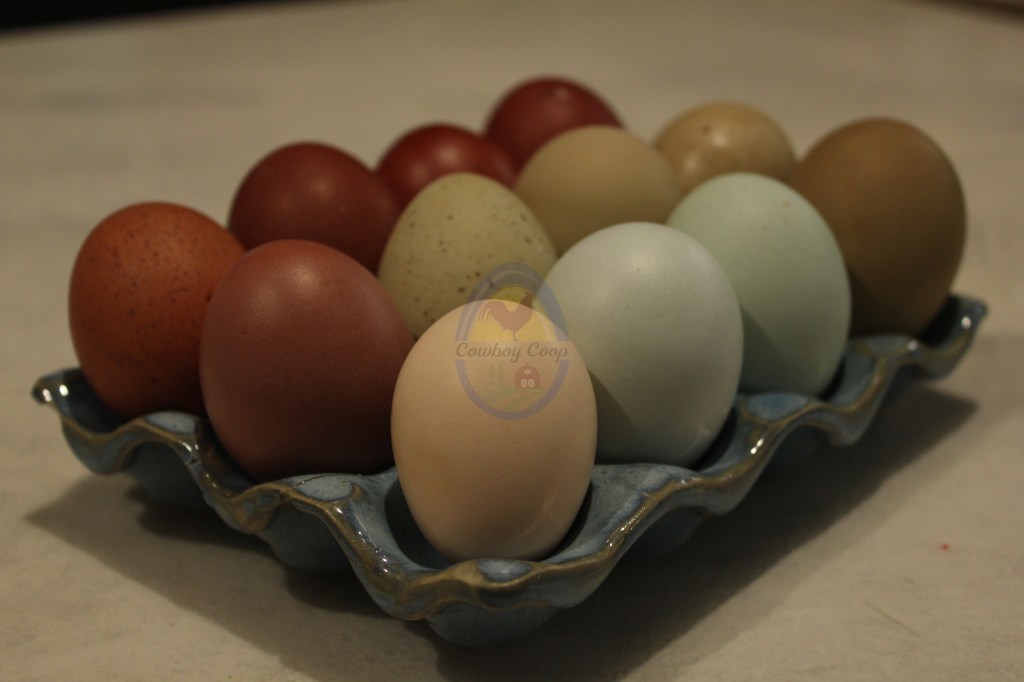
We try to offer the best birds we can, from breeds that we genuinely enjoy raising and “hanging out” with! That means personality and temperament, breed standards and show types, and of course, egg color.
We love the rainbow colors we get from our flock… the wonderful temperament and funny appearance of our Silkies.. the gorgeous shades of dark brown and speckled eggs from our Marans and Olive Layers… and the calm and quiet demeanor of our Coturnix, and Jumbo Coturnix Quail.
Thank you for being a part of our small, rural, backyard poultry experience!
-Michelle
First things first….
When you receive shipped eggs, the first thing you should do is remove all the eggs from the packaging, inspect them for any cracks or damage, and set them down in an egg carton or tray “pointy end down”.
For lighter colored eggs, I would recommend candling them, and making note of how the air sacs in each egg look. This can be very difficult, if not impossible to do with darker colored eggs, such as our Marans, darker Olive Eggers, and out Coturnix Eggs. If you have dark eggs, and it is too hard to candle them, it’s okay! Just skip this step.
Eggs should sit for around 24 hours after being delivered & unpackaged to allow the air sacs to heal. Shipping is VERY tough on eggs. They get tossed, dropped, jostled and thrown about for 2-4 days in a very busy environment. We always try to package our eggs to the best of our abilities to ensure they are shaken as little as possible.
When you let the eggs “rest” prior to incubating them, you allow the air bubbles that may have developed during shipping to settle, and the air sacs to (hopefully) re-attach back to the membrane of the shell. This is a crucial first step in incubating your shipped eggs.
Test…. test… test!
If you are new to hatching eggs, we highly recommend testing your incubator before using it every time you plug it in. Do not solely rely on the incubators internal temperature and hydrometer sensors. I have included links (at the bottom of this page) to a thermometer/hydrometer combo that I use in all of my hatches. You should always check to make sure your hydrometer is calibrated, and your incubator matches your secondary sensors. Even a few small degrees or percentages can cause havoc in a hatch! I also recommend purchasing a quality incubator. I started off with cheaper Styrofoam incubators and once I upgraded to cabinet incubators, I couldn’t believe how much better my hatch rates were. I personally recommend any Brinsea product – their Ovation series (while a bit pricey) are well worth it. GQF makes fantastic cabinet incubators but most folks will only hatch a small amount of eggs at a time. Another one I have heard wonderful things about is the Nurture Right 360 by Manna Pro.
After the eggs have rested for 24 hours, and you have warmed up (AND TESTED!!!) your incubator to ensure the temperatures and humidity are correct, place your eggs inside your incubator pointy end down (if using an incubator with an egg tray), or gently on their sides (if you are using an incubator that pushes them around in a circle). If the eggs had detached air sacs/cells, I would recommend keeping the egg turner off while starting incubation, for an additional 48-72 hours. If your incubator doesn’t have an egg turner, do not manually turn for 2-3 days. After 2-3 full days, you can candle again and see if there is any improvement in the eggs with detached cells.
Unfortunately, some eggs may arrive entirely scrambled inside. This happens when employees or equipment have shaken, dropped, or damaged the box too much. We really do try our best to package our eggs to limit how much force they take, but once a package leaves our farm, there is nothing we can do to ensure the folks who handle your package actually take care when in possession of it. If your box arrives to you completely trashed – I am talking corners smashed in – holes punched through – eggs leaking out of the box… STOP; take photos and I will help you file a claim for damaged goods. I will not file a claim for you – I explain more on my shipping policies page if you would like to know the reasons behind this – But I will 100% help you file a claim for mistreatment of your package. This very seldom happens but I can help if it does! The link to my policies is in the references section at the end of this page.
What can you expect?
Shipped Eggs are ALWAYS a gamble. I got my breeding stock started from shipped eggs, and there are times where I had fantastic success with close to 90% eggs hatching. And there are times where I have gotten entire shipments and didn’t hatch a single bird. It can be tough, and really frustrating at times.
You can expect an average of 40-50% hatch rate with shipped eggs. There are so many variables that can affect this rate from poor, or great shipping journeys, to how well the hens have eaten in a specific week, to how well your package has been treated by postal employees, to the weather and temperatures, how humid or dry the climate is, and many more factors. Purchasing shipped eggs is a risk, but if you want to get specific stock, certain colors, or different breeds it is a risk you need to be willing to take.
Should I wash my eggs?
Nope! In fact, we recommend touching the eggs as little as possible, and only candling 1-2 times during incubation. Human hands have an astonishing amount of bacteria on them… Yuck!! Always try to wash your hands, or use hand sanitizer before handing your incubating eggs.
One of the last thing a hen does before laying an egg is depositing the “Bloom”. The Bloom is a protective cuticle coating which protects the egg from bacteria that may otherwise penetrate it’s pores and cause the egg to go bad. If you wash, or get your eggs wet, it washes off this nearly perfect protective layer, leaving your eggs open to contamination.
We try to only ship the best eggs possible. Some dirt, or feces are acceptable to leave on while incubating eggs, but we never will ship heavily soiled or yolky eggs. If you have eggs from your flock that you are wishing to incubate, but they have some dirt or debris on them, we recommend taking a dry cloth and very gently scratching the debris off.
So… how long does this all take?
Chicken Eggs take 21 days on average to hatch. Some bantam eggs (including some of our Silkies) may hatch earlier than 21 days. On Average, if I hatch 100 Silkie eggs at a time, I get 8-11 chicks that hatch between day 19-20, and the rest hatching on day 21-22. Jumbo Coturnix Quail eggs will take approximately 17-18 days, but chicks may arrive between days 16 and 20 – and standard Coturnix take an average of 16-17 days, but may hatch between days 15-19. Did you know most species of birds all have varying hatch times? Ducks, Geese, and Turkeys all take an average of 28 days to hatch!
I recommend candling your eggs before you incubate to check for damage to the air sac/cells, and to not candle again until you lock your eggs down. “Lockdown” is the term we use to describe the time when egg incubators have their settings optimized for hatching. When you lockdown your incubator, you will remove the eggs and candle for the last time. Remove any and all eggs that have died or have not developed. Remove and turn off your egg turners, and turn up the humidity.
I will link a good source for candling eggs and what to look for in the references below. Please keep in mind that Dark Olive Egger Eggs, most Marans eggs, and the darker/larger spotted Coturnix Eggs will be nearly impossible to candle like your typical light colored egg. I haven’t found an egg candler that can show me veins in these dark eggs so I use a different method.
Marans/Dark Olive Egg Candling
Please note that I do not candle these breed of eggs except the day of lockdown. Eggs are either placed back in the incubator if they are viable, or discarded at that point.
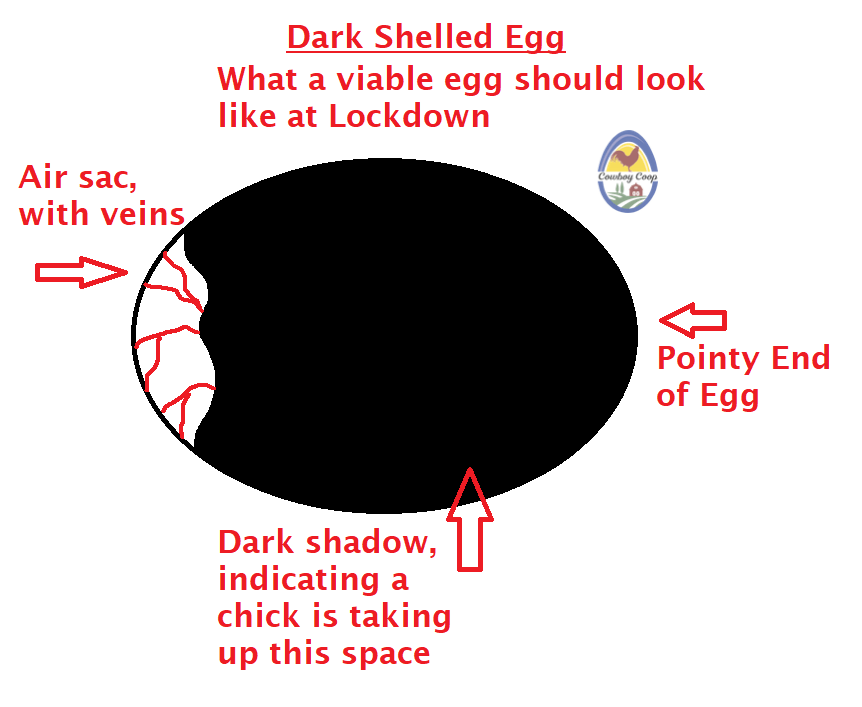
On day 17-18 when you lockdown, you are looking for 1 of 2 things. If you shine a light on the eggs, you are looking for the majority of the egg to be totally dark. If the light is illuminating the egg and you can see light through most of the egg, it is a dud. If the light stops at the top inch, and is dark the rest of the way down, then that egg is most likely still viable.
Examples
I will try to get photos of my eggs to share as example in the near future, but right now all I have are example illustrations.
In this first illustration, we have a Dark Shelled egg that is viable, with a chick filling up the majority of the shell. This chick is most likely on day 17-18 of development. This is what you are looking for when you are candling a dark shelled egg on day 16-17-18.
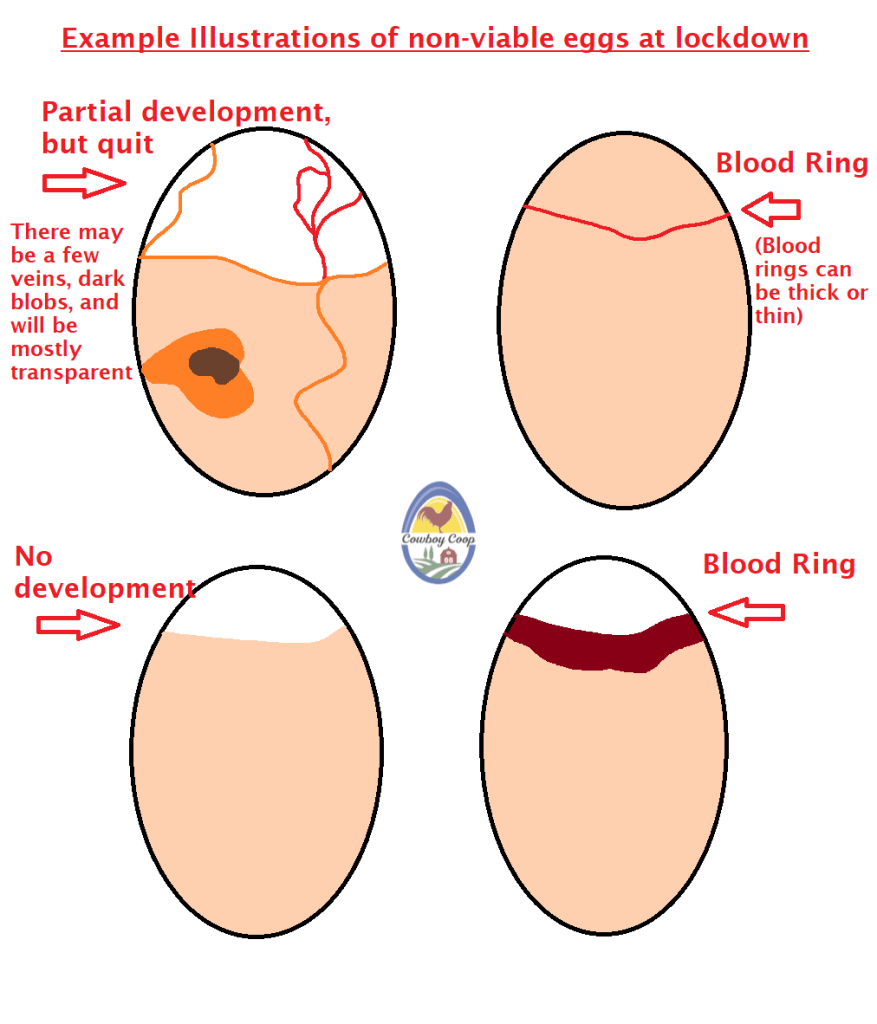
This second illustration is what you can expect to see from a dark shelled egg on day 16-21 if the egg is NOT viable. Can you see light from the top to the bottom? If so, there is most likely no embryonic development in this egg, and if a Marans or Olive Egg looks like any of these examples below on lockdown, you are probably safe to discard it.
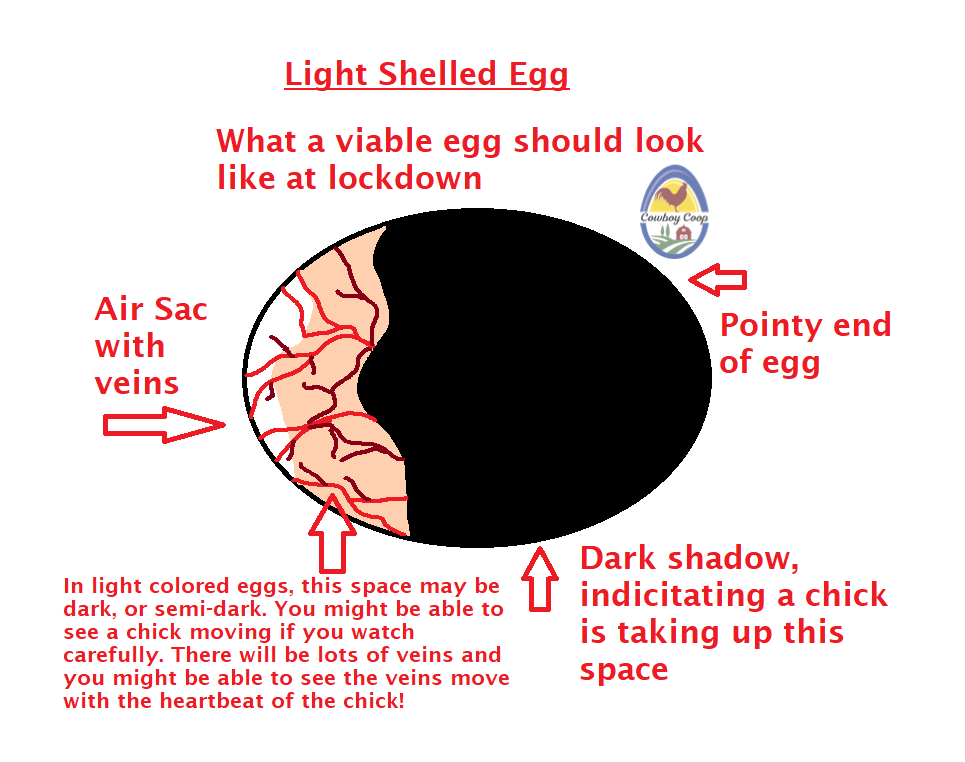
I also made an illustration to show what a light shelled egg should look like on lockdown. That illustration is below.
Development….
The most common misconception I hear from time to time is “I cracked my eggs and saw no development, my eggs were not fertilized”. This is unfortunately an inaccurate statement, and I will explain why. Once you add heat to your eggs, and they begin to develop, the blastoderm starts breaking down in preparation to become a baby chick. Once this happens, all evidence of the sperm and the “bull’s-eye” in the egg vanish. It is not possible to tell if an egg is fertilized by a rooster after you begin incubation. It may be possible to see the bull’s-eye on day 1 to possibly day 4 or so, but after that it is nearly impossible to detect. The reason I am including this, is I see a lot of breeders online getting blasted for selling “infertile” eggs… when the truth is the proof of fertilization becomes unrecognizable after a few short days of incubation. While I cannot personally vouch for the other breeders out there – on our farm we make sure to do weekly fertility tests in our flock. I am routinely cracking 2-3 eggs from every pen we have, every single week, and looking for bullseyes in them (Don’t worry, they become breakfast). I will not state that I have 100% fertility every day of the week, because let’s face it- that’s unrealistic. When it gets really hot outside, fertility is lower. When it’s really cold outside, fertility is often times lower. If the hens don’t like a specific rooster they can… and I swear this is true… REJECT their sperm. That’s why I am always checking. If I am not seeing great fertility in my pens (I like to see 90% Plus) then I won’t sell eggs from that pen until the issue resolves itself. For example, I had to close my Marans and Olive Pen down this July because the heat was just too much for the boys. They possibly were not mounting the hens as often as they should because it was too warm, or there may have been some potency issues. It happens! Responsible breeders will be open about this and not sell eggs when they are seeing issues arise in their flock.
My Personal Incubator Settings – Here in NW Montana
After many years, trials and tribulations, I have found these settings to work best for me. Please note that these settings may not be optimal for you. I always recommend tweaking your settings as you learn and hatch more. Where you live, as well as where your stock comes from can affect how well your eggs hatch (or don’t!). Things that may affect your hatch rates: elevation, relative humidity in your specific area, and temperatures in your area. I have always had better success from eggs that came from a high and dry climate because we live at 3,000 ft elevation in a very dry area. You may find that higher humidity works better for you while incubating because of where you live! Something to note…. keeping your humidity and temperature STABLE throughout the incubation process is just as important as the settings you use. Fluctuations in humidity (forgetting to add water, or your incubator constantly going from 20-40%) can negatively impact hatch rates.
I hatch at:
99.5 degrees F and 35-42% humidity from days 1-17
I lockdown my eggs on day 17, and adjust my incubator settings to:
99.5 (no change) and bump my humidity up to around 50% humidity. When the chicks begin to hatch, they will increase the humidity inside the incubator. I typically see my best hatch rates when I set my incubator lockdown humidity to 50%, and see it naturally rise inside to around 58-62% humidity. Personally, anything higher than 68-70% and I see chicks start to drown in their eggshells.
Note For Quail: We like to hatch a little lower than the chickens and see the best success at 30-35% on day 1-15 & 45-50% at lockdown
They are hatching!!! What now?
Yay! It’s hatching day! You’ll find out that chicks don’t all hatch at once. Some may hatch early, some may hatch late, and others will be right on time. This can take a few days overall. I highly recommend you resist the urge to open up your incubator, or to “assist” any chicks with hatching until you are sure that all the eggs have finished hatching. Trust me – I know EXACTLY how hard this can be. I have hatched thousands of chicks so far, and I can tell you I have done far more damage by not waiting for the chicks to hatch then by “helping them”. If you open up your incubator, you can risk “shrink wrapping” the chicks that are still hatching, which can spell almost certain death for them. “Shrink Wrapping” occurs when a sudden humidity drop happens in the incubator, and a blast of dry air hits the membrane of a chick who has started to hatch. Opening the incubator can affect chicks that have nearly finished hatching, or chicks who have just pipped their external shell. Even if it is “just for a quick second”.. that dry air can be disastrous for the babies trying to hatch, especially if you live in a dry climate. Instead – wait a while for your chicks to hatch themselves. They have amazing instincts, and they know just what they need to do. 99% of the time, you really don’t need to help. Also… when they hatch, they are still absorbing their yolk. Fun Fact! Chicks can live up to 72 hours without a single drop of water, or smidgen of food because they are still absorbing their yolk! That is how baby chicks are able to be shipped to you in the mail! The only time I will intervene, is if I have seen a chick who has not made any progress in 12-18 hours. I will post a link in the reference section, but if you are planning to assist a chick to hatch, I would also watch a few YouTube videos, and be prepared for the worst. A lot of chicks that need assistance will not make it. There is usually a physical issue with these chicks, and nature unfortunately usually takes it course.
We made it!
There it is! That’s the crash course on hatching shipped eggs (or eggs in general!) I hope this has been helpful. We want to wish you the best of luck on your egg-citing journey. Please remember, this is just a helpful guide, and not the end-all to knowing how to successfully incubate and hatch baby chicks. This is just information I have accumulated over the years and how I personally hatch chicks. The more you hatch, the better you’ll understand how this process works, and what works best FOR YOU! It varies for every single person. Don’t beat yourself up if you get a poor hatch rate – it happens to everyone. It’s a long learning process, but you’ll get better the longer you do it, I promise!
Please reach out if you have additional questions, we’d love to help!
References
Our website:
www. cowboycoop406.com
facebook.com/cowboycoop406
Our Shipping Policies:
https://cowboycoop406.com/shipping-information/
I am not affiliated with any of the links below, and do not receive compensation or any formal sort of acknowledgement from them.
Hydrometer/Thermometer Combo that I have had success with:
Search for: “4-Pack Mini Digital Electronic Temperature Humidity Meters” on Amazon.com or visit This Link.
Candling Eggs FAQ – 3 Websites to check out that I think have great advice:
1. https://backyardchickenproject.com/candling-chicken-eggs-day-by-day/
2. https://poultrykeeper.com/incubation-brooding/candling-eggs/
3. https://backyardpoultry.iamcountryside.com/flock-files/egg-candling-chart/
Best Egg Candlers – Different options on the website below with Pros & Cons
https://www.livestocking.net/incubator/best-egg-candlers
When and how to help a chick hatch:
https://poultrykeeper.com/incubation-brooding/how-to-help-a-chick-hatch/
